|
BASIC
ELECTRONICS COURSE
Page 32
 INDEX
INDEX
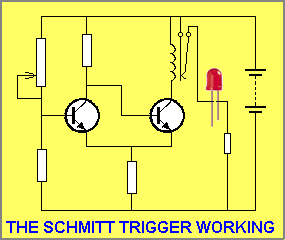
THE TRANSISTOR SCHMITT TRIGGER
The Schmitt Trigger can be made with two transistors and
for some applications, this has a definite advantage over the
Schmitt Trigger in the form of a digital gate (in a chip).
We have already
covered the characteristics of a Schmitt Trigger. Its output changes
very rapidly from a LOW state to a HIGH state and back again as
the input voltage rises and falls SLOWLY.
A typical application is turning a fan or heater ON and OFF
at particular temperature levels. The circuit operates a relay
and, depending on the current-rating or the relay, it can
operate a low or high current device. There is a certain amount
of "setting up" required to get the circuit to turn ON
and OFF at the required temperatures, but once these are
worked out, the circuit is very simple and reliable.
Firstly we will look at how the circuit works. The animation
below shows a potentiometer moving across a small percentage of
its range and turning the relay on and off. The angular movement
of the potentiometer will depend on a number of things:
1. The resistance of the top resistor,
2. The resistance of the potentiometer,
3. The value of the emitter resistor, and
4. The current required by the relay.
The value of these resistors will have to be worked out by experimentation, so we
will look at the basic operation:

The
animation above shows the first transistor turns ON when the
wiper is moved towards the positive rail and
this turns the second transistor OFF. The wiper has to be
moved down slightly for the first transistor to turn OFF, and
this turns the second transistor ON. The potentiometer and
resistor form a voltage-divider network and the voltage at the
join is the "turn-on voltage" for the transistor.
The same "turn-ON" effect can be created by adjusting the top resistance
in the voltage divider network. This is shown in Fig: 2. below.
This is only a theoretical circuit as the potentiometer should
have a small-value of resistance between the pot and positive rail to
prevent the pot being taken to the positive rail causing a very
high current to flow into the base. This resistor is called a
"stop resistor" and is not shown on the diagram. The
pot will really only have to be moved slightly from its lower position
but everyone loves to turn a pot fully clockwise to see what
happens!
The
gap between the ON and OFF states of the circuit is called the
Hysteresis Gap and this
can be widened or narrowed by changing the value of the emitter resistor.
But before we go into this value and all the other component values, we need to explain the
secret behind the "snap action" of the relay.
It closes
very quickly when the potentiometer is turned very slowly in one
direction.
Normally a single transistor driving a relay will gradually
energise a relay or turn a LED on slowly as the potentiometer is
turned.
But the action of the two transistors creates a SWITCHING EFFECT
where the output changes very rapidly from one state to the
other.
This is very important if you are driving a relay as it prevents
the relay "chattering" and burning out the contacts.
The secret in the snap action lies in the feedback line
between the two emitters. This is shown in bold in the diagram
below:
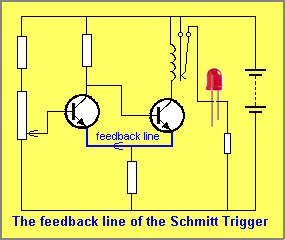
Here
is how the feedback line works:

The animation above shows how the first
transistor gets "jacked-up" by 0.1v by the action
of the second transistor. This is due to the
voltage drop developed across the emitter resistor being fed
back to the first transistor. But it still doesn't explain the SNAP
ACTION.
Let us take it in slow motion.
When the voltage on the base of the first transistor is low, the
second transistor is turned ON via the resistor on its
base. This resistor is also the collector resistor for the
first transistor but at the moment it is acting as the
"turn on" resistor for the second transistor.
The relay is energised and current flows through the coil. This
current also flows through the emitter resistor and say it puts
a 0.1v drop across the resistor. This voltage is passed to the
first transistor but at the moment it does not affect the first
transistor. It merely means the first transistor has to rise to
0.8v (0.7v - the normal turn on-voltage for a
transistor PLUS
0.1v = 0.8v.)
Nothing magic happens until the base voltage on the first
transistor rises to about 0.75v.
At this point the transistor begins to turn ON and the voltage
between its collector-emitter terminals reduces. At 0.751 volt
on the base, the collector voltage reduces further and as the
base voltage rises, the collector-emitter voltage reduces EVEN
MORE. During this time the collector-emitter voltage will drop
to 1v, then 0.85v then 0.75v and at about this level it begins
to rob the second transistor of its TURN-ON voltage.
This causes the second transistor to begin to TURN OFF slightly
and the current through the relay drops.
This causes less current to flow in the emitter resistor and the
voltage across this resistor falls. This drop in voltage is
passed to the first transistor and the voltage on the emitter
falls slightly.
This has exactly the same effect as raising the voltage on the
base of the first transistor BUT we are not increasing the base
voltage. This means the circuit is turning on the first
transistor for us and a REGENERATIVE action takes place in the
circuit where the first transistor gets turned on MORE AND MORE
until the two transistors have SWITCHED states VERY QUICKLY. This
is the SNAP ACTION we discussed above.
The circuit now has the first transistor fully turned ON and the
second transistor fully turned OFF. The voltage on the base of
the first transistor is about 0.7v because the 0.1v on the
emitter has disappeared and the transistor "pulls" the
base down to 0.7v as this is the maximum voltage that can exist
between base and emitter.
To snap the circuit into the other state, the voltage on the
base of the first transistor is reduced slightly.
At about 0.65v, the transistor begins to turn off. The voltage
between its collector-emitter terminals increases and this turns
on the second transistor. Current flows through the coil of the
relay and this current causes a voltage drop to appear across
the emitter resistor. This voltage is passed to the emitter of
the first transistor and you can see the base-emitter voltage is
reduced slightly without us having to do any work. This causes
the first transistor to turn OFF slightly and the regenerative
action of the circuit takes over.
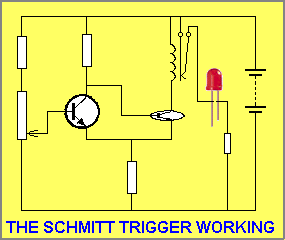
"SEE"
THE CIRCUIT OPERATING:
The animation below shows exactly how to "SEE" the
circuit in operation. When a transistor is drawn as a round
circuit it indicates a high voltage across the collector-emitter
terminals. When it is squashed, it indicates the voltage
across it is very low (less than 0.5v) and any other transistor
connected between collector-emitter will be robbed of
"turn-on" voltage. This is how one transistor is able
to turn off another transistor.
OK
Now we know how the circuit works we can interface it to
external devices. A thermal sensor can be added to the
circuit as shown in the diagram below. The thermal sensor in our
prototype had a cold resistance (@ room temperature) of 10k and
and we were told this type of sensor changed 0.5% per degree C.
It is an NTC type and this means
it has a Negative Temperature Co-efficient. In other words the
resistance DECREASES by 0.5% for each degree rise in
temperature. At 100°C the resistance will be about 6k (see
below for the actual resistance values for the probe we used in
our prototype - that's why you cannot rely on what you
are told).
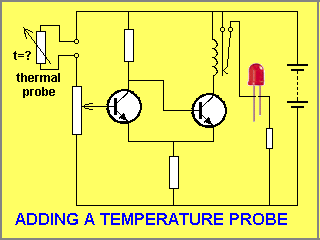
By
referring to the circuit above, you can see the voltage on the base of
the first transistor is set by the potentiometer and the circuit
will change states when the temperature rises. You must set
the LOW threshold by turning the potentiometer towards the 0v
rail until the relay is energised.
Increasing the probe temperature will increase
the voltage on the base and turn ON the first transistor.
This will cause the second transistor to turn OFF and the relay
will release.
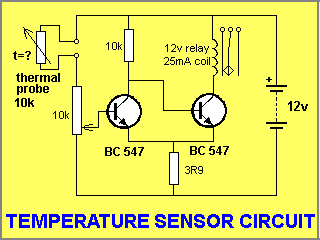
COMPONENT VALUES
Now we come to putting component values on the
circuit diagram. The
diagram below shows the values for our prototype.
AGAIN
Going over the operation of the circuit once again . . .
the voltage on the base is increased via an external device
such as a potentiometer or thermal sensor, and at a high
temperature the circuit takes over and snaps the relay OFF.
When the temperature is reduced, a point is reached when the circuit
takes over and the relay snaps ON.
The gap between the HIGH and LOW is called the Hysteresis gap
and this can be made wider or narrower by adjusting the value of
the emitter resistor.
If it is made too narrow, the feedback voltage will not be large
enough to snap the circuit into its opposite state and the relay
will chatter.
The reason for this is very technical. For instance, in our
design, the emitter resistor is 3R9. If it is reduced to 2R2,
the relay will chatter.
When experimenting, you should take values of resistors and
capacitors to their extreme so that you know how close the value
is to an unreliable design. If you don't do this, you may be
creating a circuit that is extremely close to
non-operating.
3R3 is the lowest value you should use and the highest value in
our prototype was 10R.
These values depend heavily on the current taken by the relay
(25mA in our case) and different relays will require different
emitter resistors.
SETTING UP
The first variable to set is the gap resistor. This is the
feedback resistor on the emitters.
Its main purpose is to adjust the gap between the turn-ON
and turn-OFF points. It will also move the actual turn-ON and
turn-OFF points so the gap is the first setting.
Once this is set, the actual LOW VALUE is determined by
adjusting the trimmer resistors. These are the only two settings
you can adjust as the high setting is determined by the
gap-value.
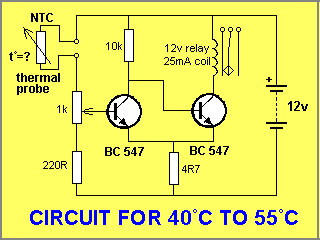
OUR CIRCUIT
The circuit we used is shown in the diagram
below. The relay pulled in at 26°C and released at 34°C. The
330R "set resistor" puts a small "set
voltage" on the base so that the 1k pot has a wider
adjustment to make it easier to set the low value.
When setting up the circuit, the probe is placed in the low
temperature medium and the pot is turned
towards 0v rail until the relay pulls
in. The probe is then placed in the high temperature medium and the
relay will release. This circuit gives an 8 degree range (8
degree gap) and this gap can be widened by increasing the value
of the emitter resistor. The characteristics for the probe used
in the circuit are as follows:
9,500 ohms at 26°C and 6,900 ohms at 34°C The probe
we used obviously had a much higher resistance change per degree
than the figures we quoted above. It changes nearly 4%
/°C

If you need to detect higher temperatures, say
40°C to 55°C, the 330R "set resistor" will have to
be lowered to 220R so the 1k pot will still have a range. The emitter
resistor will also have to be changed to 3R9 or 4R7. This is
shown below:
This concludes our description of this very
handy circuit. It proves basic electronics is still needed in
this microprocessor/digital world. Now for a few questions
. . .
QUESTIONS
Cover the
answer and scroll down to reveal
Question
:
Name a feature of a Schmitt Trigger Circuit
Answer:
The "snap-action" from one state to the other.
Question
:
What is the "secret" behind the Snap Action?
Answer:
The feedback line between the emitter of the second transistor
and the emitter of the first transistor.
Question
:
Can both transistors be ON at the same time?
Answer:
No. The first transistor turns the second OFF and the second
transistor turns the first ON and the situation is reversed for
the other state.
Question:
What
is the name given to the gap between the low and high
"change-points" where the
circuit changes from one state to the other.
Answer:
The Hysteresis
gap.
Question: If
the emitter resistor is increased in resistance, what happens to the
Hysteresis gap?
Answer: It
widens
Question: If
the voltage on the base is increased,
does the relay become energised or released?
Answer: It
is de-energised.
Question:
The
probe in our prototype has a NTC.
Does the
resistance of the probe increase as the temperatures rises?
Answer: No.
It decreases.
Question: What
is the purpose of a "stop resistor"?
Answer: To
prevent a high current flowing if a potentiometer is turned fully in
one direction.
NEXT
| 