How many times have you picked up
a transistor and wondered which is the COLLECTOR, BASE and EMITTER lead? This chapter explains how you can identify the leads of PNP and NPN
transistors.
There are 3 steps and you only need an "old-style" multimeter
to
help with the test. It's really very simple but we will be expanding the
discussion to help the beginner.
Answer the set of questions at the end and
the "computer" will give you a score.
SOME PRELIMINARY FACTS:
There are no "fixed" pinouts for the leads of some transistors. But in general there is a
"common" pinout for each style of case. Most technical data sheets include a pinout diagram but if the transistor is
unmarked or
unknown, what do you do?
Simply follow our 3-step approach:
Firstly, the transistors we are talking about are "ordinary"
transistors.
The technical name is Bipolar Junction Transistor (BJT) (other types of
transistors are: Field Effect Transistors, Uni-Junction Transistors,
and others).
"Ordinary" transistors have three leads:
COLLECTOR
BASE and EMITTER
and come in many different styles and cases.
Here are a few of the packages, including surface mount:
Note: A small "plastic" case (such as TO-92) generally means the transistor is a low current (called
"small signal") device.
A flat pack, such as TO-126 and TO-220, indicates the transistor is a medium current device and
a "high-hat"
or metal can device, such as TO-3 and TO-66, (TO-66 is a small version of TO-3) indicates the transistor is a high current device.
Each style has a case-number
called a "JEDEC number" as shown above (TO-3 etc) but this is not the important
topic. We are interested in finding the COLLECTOR,
BASE and EMITTER leads.
All PNP transistors have the same circuit symbol:
PNP symbol
This symbol does not indicate if the transistor is
small-signal, high power or the type of package. It just indicates the transistor is
PNP. Note the arrow on the emitter is pointing to the base. This is how to remember
the symbol. I have shown it this way as the emitter of a PNP normally
goes to the positive rail and this is how it will appear in a circuit.
All NPN transistors have the following symbol:
NPN symbol
The arrow on the emitter points away from the base.
NPN transistors are the most popular type. In the early days of manufacture, it was easier to make NPN transistors. The voltage and current
capability could be made higher. This made them cheaper and
most circuits were designed around NPN types.
In both cases, the arrow points in the direction of current flow (current flows
from positive to negative - high-technology instructors like to talk about
electron flow - from negative to positive - but this just makes things more
complicated). Let's keep things simple. Luckily, the arrow
points in the direction of current flow!!!
TESTING
A simple transistor tester is a multimeter - the "old style" analogue type
with
the moving needle (pointer). For this test, the multimeter is firstly switched to the HIGH-OHMS
RANGE. The high-Ohms range is used so that you will be able to pick up a
leaky transistor at the same time. More about this later.
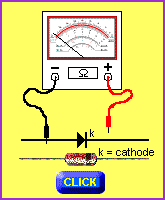
Before we discuss the multimeter, we need to know how a multimeter
"sees" a transistor. It "sees" it as two back-to-back
diodes. For the PNP transistor the cathodes are connected to the base
and for the NPN the anodes are connected to the base, as shown in the diagram
below:
DIGITAL MULTIMETER
Some digital multimeters may work as a transistor tester (mine does not work)
but others will not detect the forward voltage drop of a diode because the
voltage delivered by the meter is below 0.7v and the diode is not placed in forward
conductivity. Some digital multimeters have a transistor tester built
into them but the holes for the leads on the front of the multimeter are so fine that you need to add
extension-leads
to test the larger transistors!
OHMS RANGE
Every multimeter has one or more Ohms ranges. The lowest range is called the
"Ohms Range" as the scale on the meter is read directly. For instance,
"500" on the scale is 500 Ohms (500R). The other range is the x1k
range. "500" on the scale is read 500k. This is the setting we use for the
tests.
Inside the multimeter is a battery (1.5v or 3v) and this provides the energy to
move the needle. One very important point to note is the red probe of a
multimeter is connected to negative of the battery (inside the multimeter) and the black probe is
connected to the positive of the battery (via a set of resistors and the
meter-movement itself).
When the black probe is connected to the anode of a diode and the red probe to the cathode, as shown in the animation below, the needle moves
about 90% across the dial. (It does not move fully across because the
multimeter is actually detecting the voltage-drop of 0.7v of the diode and not
its actual resistance - but this is a technical point we will discuss later).
When the red probe is connected to the anode and the black probe to the cathode,
the needle does not move at all.
In the first case the diode is forward biased and current flows. In the
second case the diode is reverse biased and no current flows. The pointer
(needle) clearly indicates these two states. These are the two conditions we
need to remember.
Click = mouseover
Note: the multimeter is on
"x1k" scale
Now that we know how a multimeter reacts to a diode in forward and reverse bias, we can
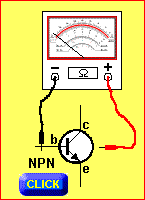
test a transistor and determine the base lead.
All you have to do is place the black probe on any lead
of a transistor. Then place the red probe on each of the other leads. If the needle moves across the
dial, the transistor is NPN. If the needle moves for only one test, try the
black probe on another lead. This may take up to 6 tests to get a final
answer. See animation below:
Note: the multimeter is on "x1k"
scale
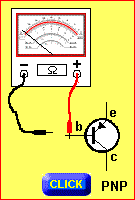
If the pointer doesn't move twice:
Place the red probe on any lead and repeat the above. When the
needle moves for both the other leads, the transistor is PNP. See animation
below:
Note: the multimeter is on "x1k"
scale
FAULTS:
If the needle does not move for the two other leads, the transistor is faulty.
It is "OPEN."
If the needle moves for ALL tests, the transistor is faulty. It is
"SHORTED."
If the needle moves slightly for one of the tests, the transistor is
"LEAKY."
We have found the BASE:
The lead connected to the black probe in the first test (the NPN transistor) is
the BASE.
The lead connected to the red probe in the second test (the PNP transistor) is
the BASE.
To find the
COLLECTOR & EMITTER:
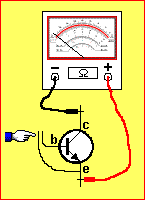
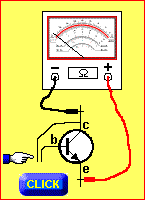
To find the collector and emitter leads we create the SIMPLEST AMPLIFIER IN
THE WORLD. It consists of the "transistor under test" (sometimes
called "tut"), a multimeter on 1k range and YOUR FINGER!
We will take the example of the NPN transistor as this is the most common
type.
The diagram below shows how an NPN transistor is connected.
When making the
test, you must not touch the third lead with any part of your body as this will
upset the reading on the multimeter.
You already know the transistor is NPN and also the base lead.
Connect the multimeter to the two leads that are not the base. It does not
matter if you get the orientation correct as the circuit will not work until
the placement is correct. The needle will not move. Place a MOIST
finger between the base and collector and the pointer will deflect almost
80% across the dial. The harder you press, the further the needle will move
across the scale.
The transistor is amplifying the current you are delivering to the base and
causing about 100 times more current to flow in the collector-emitter
circuit.
This current flow effectively reduces the resistance between the two leads
and the multimeter indicates the result. You have created the world's simplest
amplifying circuit. The diagram below shows the collector and emitter leads
connected to the meter.
Note: the multimeter is on "x1k"
scale
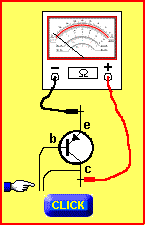
If the transistor is a PNP type, you will need to use the arrangement below:
Note: the multimeter is on "x1k"
scale
IN-CIRCUIT TESTING In circuit testing simply means to test
the transistor while it is still in the circuit. This can be done provided you
take into account the components surrounding the transistor. In other words the
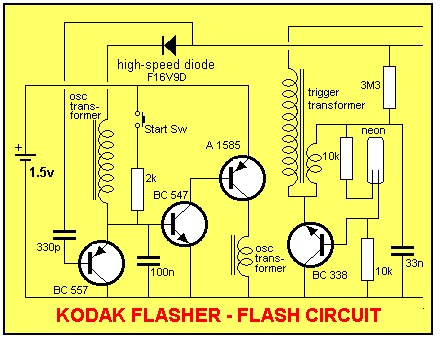
components directly connected to the transistor. If we take the circuit below,
for example,
we have 4
transistors in different "impedance situations." You can also say different
"resistance situations." The term impedance takes into account the resistive
effect of the surrounding capacitors, diodes, transistors and coils. Make sure
the power is off before making any tests and wait until any capacitors have lost
their charge (this circuit has a 120u capacitor and is charged to almost 330v).
If you test the first transistor (BC 557) (It is a surface-mount type in the
circuit - 2P or M6 - for more details on testing surface-mount transistors click
HERE) with the multimeter switched to the x1k range,
the base to collector and base to emitter reading will check-out ok but when you
test the collector to emitter and emitter to collector readings, you will get a
low value in one direction. This is not a faulty transistor but the base-emitter
reading of the second transistor! If you don't know how the circuit is laid out,
you will think the transistor is faulty (leaky). The solution is to switch to
the Ohms range and measure between the collector and emitter again. If the
transistor is faulty it will measure very low in both directions. The pointer
will not stop at 90% full scale deflection.
The same situation applies with the second transistor. The third transistor can
be tested on high ohms range. The fourth transistor has a 10k between base and
collector, which must be taken into account.
If you are not sure about the results you are getting, remove the transistor
completely or at least desolder two leads.
OTHER FAULTS
This is only a simple test for transistors that have "completely broken
down." Other faults such as heat stress, over-voltage breakdown,
high-frequency failure, or
intermittent breakdown can also occur. You may need a can of "freeze,"
a hot soldering iron or a hair dryer to simulate the effect of overheating
etc.
Try this test and see if you get 100%:
QUESTIONS:
1. Transistors are separated into two types. Name them.
Positive and Negative
P and N
PNP and NPN
PNN and NNP
2. Name the three leads of a common transistor:
Collector Bias Omitter
Base Collector Case
Emitter Collector Bias
Collector Base Emitter
3. The positive of the battery in a multimeter is connected to the:
Black probe
Red Probe
4. When testing a transistor with a multimeter, it is set to:
Volts
Low Ohms
High Ohms
High Volts
5. When testing a transistor, the first test finds the:
Collector lead
Base lead
Emitter lead
6. The easiest transistor to test is:
PNP
NPN
Both equal
7. The lead marked with the arrow is:
The Collector
The Base
The Emitter
The case
8. If the voltage on the base of a transistor increases, does it:
Turn on
Turn off
Not enough information
Remain the same
9. In the test above, the collector and emitter leads are found by
putting the transistor in an amplifying mode.
true
false
not enough information
10. In the final test (as explained above), the harder you press on the base-emitter leads, the
further the needle will swing across the display.
true
false
11. In the animation below, name the type of transistor being tested:
PNP
NPN
12. In the diagram below, what will happen to the pointer when a finger is
applied to the leads:
The pointer will move across the
scale
The pointer
does not move
13. In the diagram below, name the fault with the transistor:
The transistor has shorted between collector and base
The
transistor has shorted between collector and emitter
The transistor is not faulty
14. In the diagram below, is the diode ok?
Yes
No. It is
"shorted"
No. It is "open"
This
is a new way to present a topic. By asking questions
with "computer" scoring, you know if you are grasping the topic or
sliding over
the theory without it "sinking-in."
I hope you got a perfect score!


 we have 4
transistors in different "impedance situations." You can also say different
"resistance situations." The term impedance takes into account the resistive
effect of the surrounding capacitors, diodes, transistors and coils. Make sure
the power is off before making any tests and wait until any capacitors have lost
their charge (this circuit has a 120u capacitor and is charged to almost 330v).
we have 4
transistors in different "impedance situations." You can also say different
"resistance situations." The term impedance takes into account the resistive
effect of the surrounding capacitors, diodes, transistors and coils. Make sure
the power is off before making any tests and wait until any capacitors have lost
their charge (this circuit has a 120u capacitor and is charged to almost 330v).  The Collector