|
|
FROM
PIC16F84
to
PIC16F628

Page 33
INDEX

The most recent chip in the PIC range for experimenters is the PIC16F628. It is an
upgraded version of the PIC16F84 and has all the features of the PIC16F84, plus
some extras.
Here are the pinouts of the two chips:
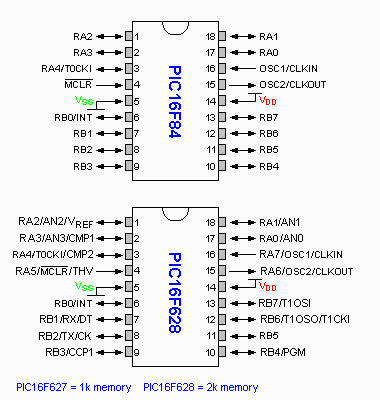
In a nutshell, the PIC16F628 has twice the memory, more than twice the number of files,
more than twice the speed of operation, an extra 3 lines, an inbuilt
oscillator (two different frequencies - 32kHz and 4MHz), a voltage comparator, and other features. All with a price tag lower than the PIC16F84!
Obviously the pressure of competition has created the features and lowered the
price to keep the PIC name on the market, and this is the power of free-enterprise.
The computer industry is proving the power of mass-production, with yearly
increases in capability and reduction in prices.
The same could apply to almost every other facet of manufacture (clothing,
medicine, cars, electricity production) if it were not for the power of cartels
and secret deals keeping prices artificially high.
At least we can be proud to be in an expansive
industry, that consistently comes up with amazing devices.
Now we have a dream of a chip to work with.
Some of the slight limitations of the PIC16F84 have been removed and we have a
chip with more memory and more registers than we need.
The built-in 4MHz/32kHz oscillator allows a project to be created without any
external components and the block diagram looks like this:
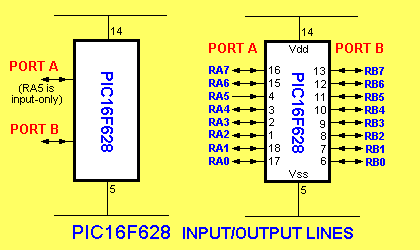
The chip simplifies to two FULL ports (Port A and Port B) with
RA5 an input-only line.
If you program the chip via the "low voltage" mode (LVP), RB4 is not available
as an in-out line.
If you are familiar with the PIC16F84, only two slight differences need to be
remembered and you will be able to migrate any of your programs to the new
chip.
During the "burn" operation, the PIC16F628 needs to be set up so that
the comparator is disabled, the MCLR
line is converted to an input for port A, the LVP bit is set to the desired
value and the internal clock is set to 4MHz.
Once you have done this, the block diagram above represents the chip.
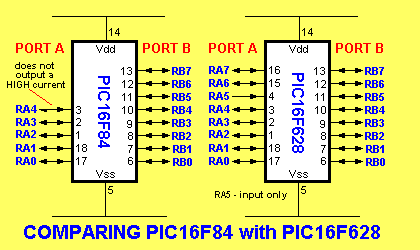
The diagram below compares the PIC16F84 with a PIC16F628:
The diagram below is a virtual picture of the files
(Registers) and memory locations in a
PIC chip.
Consider the "cells" or "files" or "locations" as one long
storage medium.
This is how they would appear:
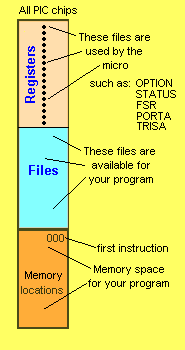
There are three separate sections in a PIC chip - associated
with writing a program.
The top section on the diagram above shows files (or Registers) that hold information that is
mainly generated by the micro, and needs to be stored for its own use. They hold the in/out nature of the pins, the
timer, the actual PortA and PortB lines, the Program Counter, the result of a subtraction etc.
You can alter the bits of some of these files and read the bits of other files, but
overall only a small part of them is used by the programmer (you).
The centre section contains the files used in a program. These files are given
"names" or "numbers" such as: 0C, 0D, 0E, 0F, 10h, 11h etc.
They are 8 bits wide and can hold a value from 00 to FF. They are called
temporary storage. They store values such as from an input line and hold it
until needed.
The lower section contains the instructions of a Program. The Program
is written by YOU. The first location in memory is called address
000 and for a PIC16F628, there are 2048 locations. The program uses the
files in the centre section.
The only other thing to remember is the location of the files. The location of
a file is the same as the "name" or "number" of the file. In other words file
0C is located at address 0C in the Files section of the micro. The PIC16F628
has 224 files, located in three different places. We will only be needing one
group of files, located at 20h to 7Fh. These 333444 files are in bank xxx and
this is the same bank as the program. This makes them easily accessible.
96 files in the PIC16F628 are located at 20h to T
xxv files are located at
PROGRAMMING
THE PIC16F628
This chip has two programming modes:
Normal Mode: 12-14v on Pin 4
Low Voltage Mode: (LVP) 5v on pin 10.
When burning a chip for the first time,
either the low voltage or high voltage mode can be used.
An instruction in your program sets LVP to "0" or "1." If it is set to "1"
you can use either re-programming method, but you lose RB4 as an in-out pin.
The PIC16F628 has a Low Voltage Programming-mode (LVP) for in-circuit
programming. In this mode, the chip can be programmed with 5v on the
programming pin (pin 10) instead of 12-14v on Pin 4.
Before deciding on the way you will program the chip, you need to know some
of the differences and limitations.
The PIC16F628 chip is supplied with the LVP bit as "1."
When the LVP bit is "1," RB4/PGM (pin 10) is dedicated to the programming
function and is not available as in-out pin RB4.
The chip will enter programming mode when a HIGH (5v) is placed on RB4/PGM
(pin 10). This is called the "low voltage" or "in-circuit" mode.
This makes the chip "in-circuit" programmable and re-programmable
"in-circuit."
If you don't want the "in-circuit programmable" feature, LVP bit must be
"0." To make LVP bit "0," the chip must be programmed via "Normal Mode,"
using 12-14v on Pin 4. The LVP bit cannot be changed when programming
"in-circuit."
When programming
via
"Normal Mode," an instruction is available to change the value of LVP.
A Recap:
If you program via the "Normal Mode" (12 - 14v to "activate" the chip
- to put it into "program mode"), you can use all
the features of the chip. (Remember RA5 is input-only, so "Port A" is not a
"complete port.")
If you program via "Low Voltage Mode," output line RB4 (pin 10) is not available as you are
reserving the pin for re-programming via LVP.
This is very inconvenient as "Port B" is normally used as a complete 8-line
output to drive displays etc. To have one line missing from the port is like
buying a book with 15 pages missing! Port A is already an incomplete Port,
with RA5 as input-only. It would have been much more convenient to put LVP
pin on port A and leave Port B complete! Such are the limitations of life!
If you program a chip for the first time: "normally," you can
re-program it "in-circuit" (via the 5v feature) or re-program it via the
"normal" method.
If you program a chip for the first time: "in circuit," you can regain the
RB4 as an in-out line by re-programming it "normally." You cannot regain RB4
as an in-out line by re-programming it "in-circuit."
When a PIC16F628 is programmed in the "high voltage" mode, the chip can be
re-programmed in the high-voltage mode or you can set the LVP bit to "0" so
that the chip can be re-programmed "in-circuit" via the LVP mode. The Low
Voltage Programming-mode allows the chip to be re-programmed by applying 5v
on pin 10 (instead of 12-14v on pin 4).
The Multi Chip Programmer "burns" a PIC16F628 in the "high voltage" mode
ONLY. You can re-burn the chip "in-circuit" or in the Multi Chip
Programmer, depending on the setting of LVP. The chip comes with LVP set to
"1."
This should
cover all possibilities.
SETTING THE LVP BIT
A
MIGRATING A
PROGRAM FROM A PIC16F84 TO A PIC16F628
Any program written for a PIC16F84 can be converted to suit a PIC16F628.
In fact any program written for a small PIC microcontroller can be converted
for a larger version.
The only thing you have to change are the "file-numbers" or "file-names." All the code
remains the same.
The diagram below shows the number of files in each microprocessor and how they
align with each other.
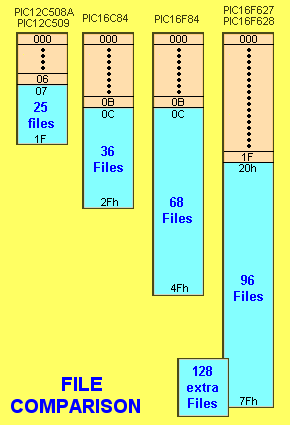
Some files in one micro align with those in
another and this is why we have suggested writing programs using only those
files that are common to both processors. This has been the case for the
PIC12C508A. To write program for this chip we have suggested only using files
that are common to the PIC12C508A and PIC16F84. The program is created in the
PIC16F84 and when it is operating perfectly, a PIC12C508A is burnt.
This feature is not possible with the PIC16F628/PIC12C508A as none of the files
correspond.
Thus our programming technique only works with a PIC16F84/PIC508A combination.
This chapter involves the process of migrating a program from a PIC16F84 to a PIC16F628.
To convert a program you need to change all the "file-names" or
"file-numbers" by adding 20h to each file. For example, file 0C becomes 2C,
file 1E becomes 3E, file 2F becomes 4F etc. Increment EVERY file by 20h
and the conversion is complete.
This means files 0C to 4F in a PIC16F84 program are now converted to 2C to 6F. Save
the
program as a PIC16F628 program and the conversion is complete.
The diagram below shows how the files from a PIC12C508A and PIC16F84 are moved
to suit a program for a PIC16F628.
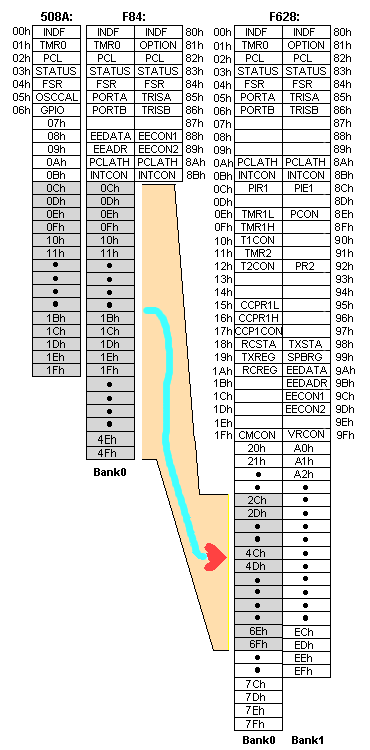
If you want a program to be
suitable for both a PIC16F84 and PIC16F628, the only files you should use in a
PIC16F628 are 20h to 4Fh. This allows the program be the "back-ward
compatible."
It all sounds very confusing but this is due to the files in each micro being
in a different location.
In this section of the PIC Programming Course, we are creating a program for a PIC16F628 and using files: 20h to
7Fh.
There are three uses for files in a program. They can be used for
general-purpose, delays or short-term storage.
Examples of "general-purpose" use can be found in most sub-routines,
"Short-term" storage uses a set of files to hold display values.
Any file can be used for any purpose and the idea of setting aside a file for
a particular purpose is part of the concepts in the PIC Programming Course.
Using this allocation for a file will remind you of its purpose and help you
understand a program when you are reviewing it at a later date.
The following table is a guide to the uses for the files:
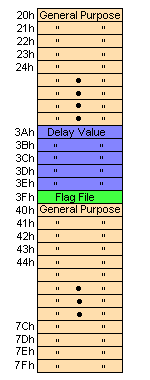
more
NEXT
|


