Be your own Cabinet
Maker
How to build custom electronic
enclosures from scrap plastic
- by
William B. Jones, KD7S
 |
Anybody who has built a piece of electronic equipment has faced the problem of finding a suitable enclosure. Commercially made boxes never seem to be the right size, assuming you can find one in the first place. Even if you do locate what you need, prices are often outrageous.
If you think this is just another problem you have to live with, think again. With a few square inches of sheet plastic and some time at your workbench you can roll your own custom cabinets. You can build them any shape or size using common shop tools. The best part is the finished product will rival commercial enclosures in both looks and functionality, but at a fraction of the cost.
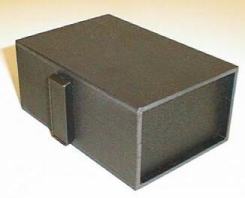
The two-piece, clamshell enclosure shown above was custom made to house a Small Wonders Labs SW40+ transceiver kit. The top and bottom pieces are held together with a pair of "NorCal 40" plastic latches. The front and rear panels slide into grooves cut in the side pieces and recessed 1/8 inch. All that remains is to drill the end panels to accommodate the controls and connectors and add some stick-on rubber feet. The end result is a rugged, attractive homebrew cabinet that costs less than $2.00 to build.
ABS Plastic
The heart of homebrew enclosures is a type of rigid thermoplastic known as ABS
(Acrylonitrile-
Butadiene-Styrene). ABS can be sawed, drilled, sanded, machined
and painted. When heated to around 250 degrees Fahrenheit, ABS can be bent or
even vacuum-formed. It is rugged, light weight and cheap. ABS is available in
several different colors including white, black, beige and gray. Scraps of ABS
can be found at plastic supply houses or sign shops for a dollar or two per
pound. A pound of 1/8" sheet will make a lot of small cabinets. Check the
yellow pages in your telephone book for suppliers.
Getting Started
Drawing a design and cutting the pieces to
size
 In its
simplest form an electronics enclosure may consist of nothing more than a few
pieces of plastic, welded and screwed together, to form a box.
In its
simplest form an electronics enclosure may consist of nothing more than a few
pieces of plastic, welded and screwed together, to form a box.
The best way to learn about ABS is to start with
a basic enclosure. Begin by drawing the outline for the top, bottom, sides and
end panels on a sheet of paper. Use a sharp pencil or fine-line permanent
marker and a steel ruler. A T-square or carpenter's framing square will help
considerably. When the layout and dimensions are correct, transfer
 the
pattern to some plastic stock. Make sure all lines are parallel. If not, your
project will not be square.
the
pattern to some plastic stock. Make sure all lines are parallel. If not, your
project will not be square.
Cutting the panels is best done with a table-saw fitted with a fine toothed blade. If you don't have a saw, don't dismay. A hacksaw or other type of finishing saw will work just fine. It will just take longer, that's all. Whatever tool you use, cut slowly and make sure your blade doesn't wander back and forth across the line.
If the saw blade gums up with plastic, change the blade speed. It doesn't take much friction to heat the plastic to its melting point. When you find the right setting you can slice through sheet plastic just like the professionals.
Welding the pieces togetherWith wood you glue - with plastic you weld
Once the pieces are cut to size you're ready to weld the box together. You can weld ABS using common PVC pipe cement from your
 local
hardware store. If you want to get fancy, there are special, water-thin
bonding agents available from plastic supply houses. While you're there you
can pick up a special syringe dispenser that makes it much easier and neater
to apply.
local
hardware store. If you want to get fancy, there are special, water-thin
bonding agents available from plastic supply houses. While you're there you
can pick up a special syringe dispenser that makes it much easier and neater
to apply.
Far from being just another type of glue, these bonding agents actually melt the plastic pieces to be joined. When the solvents evaporate you end up with a chemically bonded joint that is almost as strong as the original material.
WARNING! Be absolutely sure you have adequate ventilation while working with these chemicals. They are extremely flammable and can be harmful if inhaled.
Assembly begins by welding the two sides, one at a time, to the top. Coat
both surfaces  to
be joined with a light application of solvent. A toothpick makes a good
application tool. Immediately press the pieces together and apply moderate
pressure for one or two minutes. Check for proper alignment--make sure the
parts are square. Set everything aside for an hour or so to allow the the
solvents to evaporate. Repeat this step for the other side.
to
be joined with a light application of solvent. A toothpick makes a good
application tool. Immediately press the pieces together and apply moderate
pressure for one or two minutes. Check for proper alignment--make sure the
parts are square. Set everything aside for an hour or so to allow the the
solvents to evaporate. Repeat this step for the other side.
If you're using a syringe and liquid solvent, simply press the pieces together (clamp them in place if you can) and run a bead of solvent between the parts to be joined as shown in the drawing. The liquid will immediately be drawn into the joint area by capillary action.
Next, join the two end panels to the base. If you want to make absolutely
sure the panels are aligned properly, use your saw to cut a pair of
shallow grooves in the
 base.
Then slip the panels into the grooves before welding. Again, if you don't
have a saw, make a series of shallow, parallel cuts with a hacksaw.
Then use the edge of a file to even up the cuts to a uniform depth.
base.
Then slip the panels into the grooves before welding. Again, if you don't
have a saw, make a series of shallow, parallel cuts with a hacksaw.
Then use the edge of a file to even up the cuts to a uniform depth.
Keep in mind that it is much easier to drill holes in these panels for controls, connectors, meters, dials and such before they are welded into place.
Next, cut and weld two rectangular strips of scrap to the base. These
will be used to
 mount
four 6-32 blind nuts which will hold the cover in place. Give the solvent
plenty of time to evaporate to form a strong bond. Then temporarily
position the cover over the base and drill four pilot holes through both the
cover and the rectangular mounting strips. Next, apply a thin coat of
solvent around the insides of the holes in the strips and press the blind
nuts into place. Use a pair of pliers to embed the tabs into the plastic for
added strength.
mount
four 6-32 blind nuts which will hold the cover in place. Give the solvent
plenty of time to evaporate to form a strong bond. Then temporarily
position the cover over the base and drill four pilot holes through both the
cover and the rectangular mounting strips. Next, apply a thin coat of
solvent around the insides of the holes in the strips and press the blind
nuts into place. Use a pair of pliers to embed the tabs into the plastic for
added strength.
All that remains is to add any finishing touches such as paint or decals.
Sanding and paintingIf it doesn't look quite perfect, here's how to fix it
You will probably discover a few rough edges, nicks and scratches or other anomalies that need to be smoothed out. ABS sands very nicely so it is a simple task to erase any slight imperfections.
Tape a whole sheet of medium grade sandpaper to a flat, smooth surface. Run the assembled box back and forth over the sandpaper using light pressure. Turn the box in your hand from time to time to make sure you don't remove too much material from any given area. Repeat the process with a finer grade of sandpaper. You can finish the job by hand rubbing the enclosure with some fine-mesh steel wool.
ABS will accept spray paint very well. A coat or two of primer will help
the paint adhere better. Read and follow the directions on the paint can for
best results. And, as always, two light coats of paint are better than one
heavy coat.
You will appreciate your efforts much more than a bought cabinet and you
can make it to your exact requirements.
![]()