Making
your own
3v INVERTER
Page 5
![]()
Now we come
to the actual construction of an inverter circuit from a kit of components. The
kit is available from Stelar Laboratories and can be ordered as kit
number: TE-3V-INV-4 or TE-3V-INV-5.
Kit TE-3V-INV-4
comes with 5 lengths of
LitE Line
Kit TE-3V-INV-5 comes with 2 lengths of LitE Line and 2 small panels.
The inverter circuit in both kits is the same and the total area of illumination for each kit is the
same. The only difference is EL "string" is provided in the first kit
and a combination of "string" and flat panels comes in the other kit.
The inverter project offers a lot of potential for experimenting as you can alter
the flash-rate and intensity of the illumination by adjusting the value of the
components. It's a great fun-kit to get an understanding of how to
illuminate electroluminescent materials.
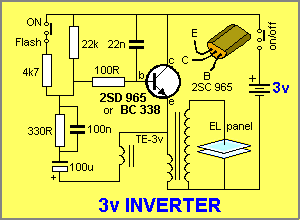
The circuit for the kit is shown below. It differs from the circuit on the
previous page in two places. The transformer in the kit has only one feedback winding and the
change from fully-ON to flashing is done with a separate slide switch. The
voltage on the feedback winding is approx 5v p-p. In the circuit on the previous
page the feedback voltage is 17v and the difference in amplitude means the
feedback components must be changed to suit. The kit
comes with an extra 33R so you can carry out the experiment to make the 2.3mm
diameter Li
t
E Line
flash very brightly.
The diagram below shows the circuit for the project:

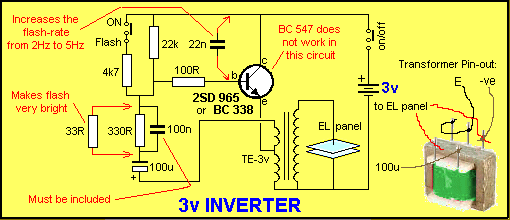
The value of the components can be changed to see what effect each has on the flash-rate and the brightness. Some of the results of our experimenting are shown in the diagram below:
On this transformer the feedback winding is separate from the other windings and thus one end must be connected to the main circuit (in this case it is connected to the emitter) and the other end to the 100u electrolytic.
|
PARTS LIST |
|
1 - 33R
1/4watt resistor 1 - 100R " " 1 - 330R " " 1 - 4k7 " " 1 - 22k " " 1 - 22n ceramic 1 - 100n ceramic 1 - 100u 16v electrolytic 1 - BC 338 transistor or 2SD 965 transistor 2 - AAA cells 2 - SPDT slide switches 50cm red hook-up wire 50cm black hook-up wire 30cm tinned copper wire 30cm fine solder 1 - TE-3v transformer 1 - 3v-INVERTER PC board 1 - length of EL LitE Line (more LitE Line is in the kit) |
CONSTRUCTION
Construction is quite straight forward. All the components fit on the PC board
provided in the kit. The overlay on the board shows exactly where each component
is placed. The only component requiring attention is the transistor. The holes
in the board have been identified with the letters c, b, e
so that both the BC 338 and 2SC 965 can be fitted without crossing-over any of
the leads. You just need to turn the transistor so that the leads enter the
correct holes.
IF IT DOESN'T WORK
If the circuit doesn't work, the first thing to do is check the current. It
should be about 45mA. A higher current will indicate the transistor is turned on
and saturated. This may be due to the wrong value resistor in the base-bias or
the feedback circuit not providing a signal.
A low current may indicate an unsoldered connection or one of the wires in the
transformer has been broken during assembly.
If the circuit fails to flash, and remains illuminated, the fault may
lie in the value of the base-bias resistor. It must be a high value so
that the electrolytic is allowed to be charged slightly during each cycle
(the base-bias resistor discharges the electrolytic). The 100n capacitor
across the 330R feedback resistor is needed to deliver spikes of energy
into the electrolytic to charge it and thus create the timing cycle.
EXPERIMENTING
Once you get the circuit to work you can experiment with the values of the
components and
observe the result(s). By bridging components across the capacitors
and resistors you get an idea of what each item is doing. The frequency of
the flash is dependent on many values including the construction of the
transformer and the number of turns on the feedback winding. Some of these things
cannot be easily altered, however changing the values of the feedback resistor
(from 330R to 33R) and the 22n timing capacitor will vary the speed considerably.
The transistor in this circuit must be capable of delivering a high current.
This is a relative term and for this circuit the maximum current may be about
100 - 200mA. If the transistor cannot deliver this current, the magnetic flux in
the core will not create saturation and the cycle will not begin.
Low-current transistors (such as BC 547) do not work.
The inverter will drive up to 1 metre of
LitE Line
or approx 6 square cm of flat panel.
PROJECTS
The LitE Line
"rope" provided in the kit can be used for all types of
displays and effects. It is very effective in model layouts as fluorescent
tubes. You need to cut it into small lengths and connect very fine insulated
wires so that it can be mounted in model houses or as neon lighting around
restaurants etc.
![]()