|
THE WASP |
A very stable BUG.
Can be carried and moved while in use.
Range: 100 to 200 metres.
Frequency: 85MHz to 110MHz - refer to article to set frequency.
This is our
first FM transmitter in a series. We will be specialising in showing how to
design very efficient FM transmitters using a good layout and correctly-designed
"tank circuits."
The Wasp is a 100 to 200 metre (100 to 200yds) device having a very stable
performance. It can be used as a hand held microphone or left on a shelf to pick up
the sounds in a room.
It has many interesting features. These will be fully described in the article.
One of the most important features of this project is the use of standard
components. This gives it universal appeal as the parts can be obtained from almost
any electronics store.
It has been designed, not only for Australia, but for all other countries, as
the web covers the world and nearly every locality has an FM allocation in the
88-108 band.
Since restrictions apply to FM transmitters in some countries, you will have
to find out the laws in your locality before commencing construction.
Some countries require a licence, some do not allow transmission at all, while others
have set aside FM bands specifically for amateur transmissions - the differing
requirements reflect the maturity of the governing bodies and their understanding
that the airwaves are community property and need to be controlled fairly.
|
The Wasp Circuit Diagram |
The advantage of this design is it can be adjusted to transmit on any frequency from 85MHz
to 110MHz, depending on the number of turns in the oscillator coil and the spacing of
the turns.
Final trimming of the frequency can be done with the air trimmer, included on the board.
This will give about 5MHz range, so you can set the frequency to avoid other
transmissions. The main advantage of the air trimmer is to set the frequency away from
anything else, as it is pointless trying to
transmit on top of another signal.
|
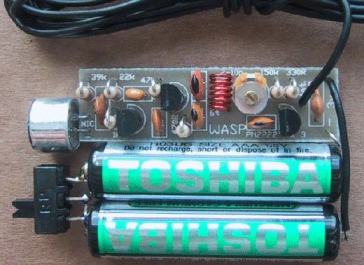
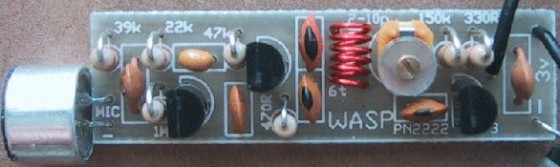
The
Wasp completed, showing the placement |
ALTERNATE TRANSISTORS
We have provided a list of alternate transistors that should have suitable characteristics.
However I must point out we have not actually tried many of the types and the results you
got will vary according to their capability at 100MHz. They may all be ok for the audio
stage but when it comes to the oscillator section, the variations will be quite
considerable.
From past experience I have found some batches of transistors work better than
others, even when they have the same type number. If you intend to build this
project from your own components, it is essential to investigate the gain of
the transistor and its performance, before starting.
This is the advantage of buying a kit. The transistors have been pre-tested by
building one of the kits to make sure everything is correct.
SENSITIVITY OF THE ELECTRET MICROPHONE
The sensitivity of all our transmitters will amaze the first-time constructor.
This is because the electret microphone we supply in the kit is very sensitive
and the circuit has high gain.
Some electret inserts sold in electronics shops have medium to low sensitivity
and will produce a very
inferior output. You have to be careful when buying inserts as they are not
identified in any way and you have no way of finding out the characteristics
unless you put it in a circuit.
When we order microphones for the kits we specify high sensitivity, low-noise
devices so that you get the best
performance.
|
A close-up of the Wasp board showing the placement of the parts |
GETTING STARTED
We classify this project as fairly simple as far as FM transmitters are concerned
and is an ideal place to start.
Before starting, you should read through the entire article.
One of the features of this is project is the fact that the frequency is stable
due to the resistor on the collector of the output transistor. This enables it to be carried around without
drifting. The whole project is very compact and has a good range.
It has been primarily designed for a
portable application, such as a minister's microphone or for a lecturer, where
the user must move around while talking.
It can be made even more compact by using button cells for the supply. We have
opted for
AAA cells for the kits as their size gives good battery life and the whole thing
will fit inside a Tic Tac box.

You
could just as easily use two button cells but
it is not advisable to solder to these types of cells. Instead, you should bend
up some
paper clips to hold them in place. Some of the commercial lapel FM microphones
are beautifully presented on the outside but their range is
considerably less than you expect and we have been very disappointed. This project
works much better than any of the types we have seen.
A brief outline of the ability of the WASP will help you compare it with our other
designs.
The WASP will transmit up to about 100 to 200 metres under favourable
conditions but when you carry it around, the range is reduced to 20 - 50 metres due
to the fact that the body absorbs a large percentage of the signal. It transmits on
the 88 - 108MHz band with the coil provided in the kit but this can be changed to
above or below the commercial band by following our notes, later in the article.
In all cases you must select an unused portion of the band so that the transmitter
does not interfere with any other radio stations.
Frequency, range and fidelity are superb on FM and the reproduction is crystal clear.
You can use this project for listening to
wildlife, tracking animals, remote listening for security purposes, as an early warning
alarm; for transferring TV sound from one room to another or listening for intruders
at a remote part of your property. Its uses are limitless and it is especially useful
for situations where it is required to be moved or carried, such as for stage-work.
We will leave the ideas up to you. Kits for the WASP are available by mail-order
from Talking Electronics.
Without any more discussion, let's start.
|
The PC Board Artwork for The Wasp |