"In
Circuit"
ELECTROLYTIC
TESTER
Page:1
INTRODUCTION
This project comes in two versions:
as an "add-on" for the 5x7 project
(pages 1&2)
and as a "stand-alone" project
(pages3&4).
Read both sections before deciding on which version you will build.
![]()

This project adds
three features to our Microcontroller Course. It shows:
The versatility, cheapness and adaptability of a microprocessor project.
INTRODUCTION
Firstly, we will describe the "add-on" version for the 5x7
Display as this is the cheapest version and, quite frankly, it only deserves
a few dollars as a piece of test equipment.
It's "all the rage" to have an Electrolytic Tester for
servicing equipment and yet I have serviced over 36,000 appliances without
one. Possibly it took me a long time to realise electrolytics have the capability
of drying out because old-style electros were inherently very reliable and,
of-course, they were not old when the equipment was being repaired.
Now . . . it's not impossible to live without one. All you have to do is replace all
the electros in a faulty piece of equipment, then turn it
on and see the results.
Charles had a stereo amplifier in for repair recently and he started at one end of the
board and replaced every electro. He tried the amplifier at regular
intervals and as the electros were replaced, the output improved. After replacing
the last few, the output was fantastic.
Russell had the same
experience. He was servicing a fax machine. After about 50 electros, the
screen came on with the correct start-up instructions, the beep tone was correct,
the machine automatically answered the line and the fax was readable. All
these faults gradually developed over the years. And they were all due to
electro's drying out!
Faulty electros create enormously unusual faults. All due to drying out.
Only last week Charles had a 4 watt amplifier (operating from a plug-pack) and the background hum was excessive. A new
1,000u electro in the power supply reduced the hum to near-zero.
In this case ripple voltage was getting into the amplifier. Exactly the
same thing can occur with a more-complex piece of equipment. The
motor and thermal heaters in a fax machine produce glitches and "noise" on the power
rails and this gets into other sections of the circuit. Electrolytics
are designed to absorb these ripples by acting very similar to miniature
rechargeable batteries. They absorb the spike when it is higher than normal,
and deliver energy to the power rail when the rail voltage is lower than normal.
Sometimes
(very rarely) an electro is designed to pass a signal from one stage to another. If the electro is dry, the amplitude of the signal delivered by
it will be lower than expected and
faulty processing may occur. There are a few other areas where electros are
used (such as integrating and separating signals) and it is not
connect to either power rail, but most of the time they
are connected across the
power rails.
In most cases the circuit surrounding an electro can be classified as low-impedance. This means it is
difficult to test electros while they are "in-circuit" (because
components such as chips are closely connected to them - and they have a
low resistance). But if the voltage on the electro is below rail voltage,
the effect of the surrounding components is minimised.
Basically electros cannot be tested with a multimeter unless you provide a voltage to charge them and then measure how long it takes them
to discharge through a known resistance. That's why you need an
Electrolytic Tester.
THE BOARD
The PC board for the Electrolytic
Tester is shown below. It is connected to the
5x7 Display project with 4
leads. The termination on the 5x7 Project is a 5-pin plug (one dummy pin for
alignment)). Two "test
leads" are
taken from the Electrolytic Tester PC board to the
electrolytic-under-test. One has an earth clip (crocodile or alligator
clip) and the other has an E-Z clip (a long clip with a very small hook on
the end that clamps around a lead).

The figure below shows the Electrolytic Tester PC board connected to the 5x7 Display. The leads are identified as positive, RA1, RA0, earth.
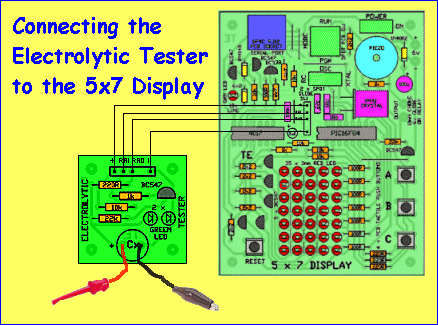
The ELECTROLYTIC TESTER
connected to the 5x7 Display
TWO WAYS
There are two ways to test an electro "in-circuit."
The first method is to determine the time needed for it to charge to a known
voltage.
The other is to charge the electro then discharge it
through a known resistance.
Both methods have an inherent inaccuracy due to the surrounding circuit
components being connected to the electro. When the electro is out of
circuit, the current from the tester will charge the electro to a certain value
in a known time. From this we determine its value. When the
electro is "in-circuit", some of the current will flow to the
surrounding components and the electro will take longer to charge. The test
will think a larger electro is being tested and will produce an
over-value.
To avoid this we have opted for the discharge method.
If the surrounding components have a very low impedance,
the reading from the tester will be lower than expected. In this case, the
answer is to remove the electro from the circuit and re-test it.
"ADD-ON" FOR THE
5x7 DISPLAY
This project is an add-on for the 5x7 Display. It has been designed to show how easily you can add to an existing project.
The Electrolytic Tester section consists of 7 components on a small PC
board. This board connects to 4-pins on the 5x7 Display with 4 lines.
The operation of the project is done by the program in the
microcontroller. The components on the Electrolytic Tester PC board are merely
interfacing components. They connect the lines of the micro to the
electrolytic-under-test.
The 220R limits the charge/discharge current to a known value and the
transistor detects when the electro has discharged.

HOW THE CIRCUIT WORKS
The circuit looks very simple but the two components in the "font
end" provide a very accurate discharge-time.
These two components are the 220R and the voltage-reference (made up of the
two green LEDs). A green LED produces a characteristic voltage across it of 1.9v. Two LEDs have a voltage of 3.8v across them and this
voltage remains very constant. This voltage behaves exactly the same as if a
3v8 zener diode was in circuit. The advantage of the LED(s)
is visual. You can see when the electro is charging.
The electrolytic-under-test is charged to 3.8v. This gives it a known
amount of energy and if it is 1u, it will have
"one-unit" of energy. If it is a 100u, it will have 100 units of
energy. If we place a resistor across this electrolytic, it will take one
unit of time to discharge the 1u and 100 units of time to discharge the
100u. The resistor we are talking about is the 220R when the micro line is
taken to 0v. Our second accurate voltage-point is the lower voltage-level. This is
detected by the base of a transistor. The electrolytic is discharged between
3.8v and 0.7v. Between these points the discharge-rate is fairly
linear.
MORE ADD-ONS
This project shows how add-ons can be connected to a project. You have
already seen how the 5x7 matrix can be used to display figures and letters
as well as animation. Using this knowledge gives you an enormous scope for
creating a really impressive project by merely adding a front-end. The
4 lines to the 5x7 use two port lines that can be configured as input or
outputs and although the lines are already connected to another device, with
clever circuitry you can add other things to these lines. If you need any
more lines, they can be taken from under the 5x7 board via a separate plug-and-socket.
Examples of projects that can be connected to the 5x7 are:
A Heart-Rate monitor, an Ultrasonic Tape Measure and a Blood Alcohol
Detector. There are lots of other ideas and anything that needs a readout
can be connected.
PROTO BOARD
No matter what you design, Talking Electronics has made it easy to get you
started. We have a small proto board about 4cm x 3cm containing
long pads and a positive and negative rail as shown below. It has no holes and has been
designed for prototyping. It is called Experiment Board MkIII.
Our method of prototyping may be new to many readers, but has been described
many times in our 20 years of publishing.

Experimenter Board MkIII $3.30 plus post.
The only real way to prototype a project is on a board shown above. It is
very difficult to build a project on a board with holes and circular lands
because you have to turn it over to join up the components and this takes a
lot of complex thinking. You may have seen a lot of
"scratch-pad" areas on development systems consisting of holes and
circular lands. But have you tried to use them! They are not really
suited for development work. They are for the next stage in a design. Once
you get a circuit working you can transfer it to an area
where it can be added to a micro. But where do you do the actual
designing? This is the purpose of the Experimenter Board. It allows great
flexibility and ease in placing components without much effort. This is
important when you are designing something. You don't want to be distracted
by the placement of the components.
With our design, the parts are soldered (with long leads) to the lands and almost no jumper wires are needed. All the parts sit in a "birds-nest"
or "rats-nest" arrangement and you can see exactly how everything
is connected without looking under the board. No only is this quicker, but
fewer mistakes are made. At the end of the development work, the parts can
be taken off the board and re-used or fitted onto a "scratch-pad"
as explained above. This is what I used in developing the Electrolytic
Tester and it makes prototyping so much easier.
The next stage in the development process is making the PC board. But
firstly a circuit diagram is drawn and the board is created on one of the
PC board drawing packages. An overlay or top-layer is always included on all
our boards and this is one of the things that stand us out from most other
magazines and books. Our overlays include the value of every component and
the board has the name of the project. Many magazines have a
code-number on the board and this might be ok for the month of issue,
but who can remember a code number in 2 year's time! That's why so
many magazines have fallen over and the same with kit suppliers, and even
manufacturers! It's simple things like this that make your product accepted or
rejected.
You can get PC boards manufactured for as little as $100, on a
panel 25cm x 15cm, so it's not impossible to produce a project yourself and
get it fully developed without any outside help.
Obviously our 5x7 concept is very "experimentally orientated" but it's the
only way to get an idea up-and-running. Once you get the concept working,
the final design can take a completely different form. But without prototype-ability,
it is very difficult to start.
From start-to-finish, the Electrolytic Tester took 2 full days of
programming. Most of the program was taken from the 5-Digit counter and one
of the software items you need to develop a project like this is MPASM. This program takes your ASCII file (.asm file) and produces a .hex
file for loading into PIP-02. To download MPASM, click
HERE.
Go to: Construction.
Or: Burning the program into the chip and using the Tester.