I am
trying to get my JDM programmer to work using icprog
1.03b under windows 2000 but it won't start comes up
with errors missing driver etc. ic-prog driver is
not installed .
Get the icprog driver...
Get the latest version of ICPROG.
I now get a message "Privileged instruction " when I
try to use. It happens on all versions
Change ic-prog's compatibility to Win98. Right click
on the icprog.exe and click on Compatibility Tab.
|
PIC PROGRAMMER |
|
|
PIC Programmer MkV
is designed to get you into PIC Programming for just a few dollars. It
uses just 12 components. Most of them will be in your
"junk-box" and the PC board is a small piece of matrix board.
It's the cheapest way to get started.
As well as PIC PROGRAMMER MkV you will need these 4 things:
2. A software program called IC-Prog 105C-a and some helpful notes to guide you with setting up your computer. (This project is not suitable for In-Circuit Programming. You need to remove the chip from the project you are creating and program it in the 18 pin socket on the programmer. Eight pin chips are fitted with pin 1 aligning with pin 1 of the socket.)
3. A PIC chip, either PIC12F629 or PIC16F628 and
4. A project using one of these micros.
This will get you into producing a MICROCONTROLLER PROJECT.
We have concentrated on two PIC chips. An 8 pin and 18 pin chip. The 8 pin chip can be either PIC12F629 or PIC12F675 and the 18 pin chip is PIC16F628 or PIC16F675.
The programmer will work with many other chips but we are concentrating on these two types to get you started.
Not only is a microcontroller project simpler than using lots of discrete chips, but it can be cheaper and easier to modify and provide a greater range of features than lots of individual chips.
On top of this you can produce a project that requires a program and this can be "locked" from prying eyes. This makes it saleable and you can protect your Intellectual Property - and make money.
Talking Electronics has produced a range of simple projects and provides assistance to get you into programming and creating projects that you have only "dreamed of."
Getting into microcontroller programming will change your life.
But before we go any further, let's build the programmer:
THE CIRCUIT
Here's the starting point:
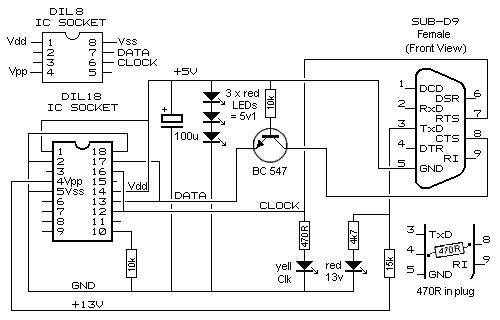
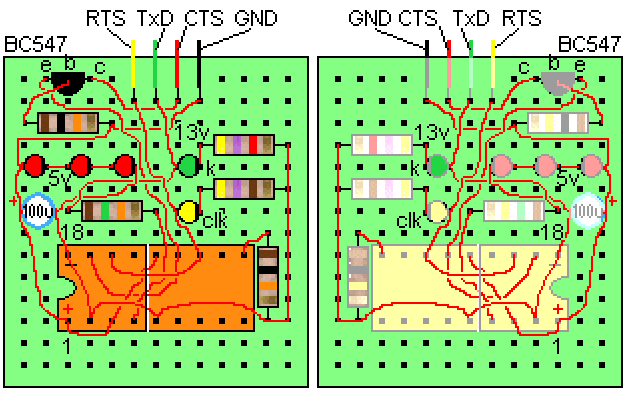
The circuit is constructed on a small piece of matrix board. All the components are readily available and the 3 red LEDs act as a visual indication that the programmer is operating as well as creating a 5v rail for the chip. The other two LEDs indicate the clock line is operating and 13v is present on the programming pin. It does not indicate the actual voltage - you will need to measure the voltage with a voltmeter to determine this.
A 470R resistor is connected between pins 4 and 8 inside the plug. This allows 4 lines to be taken to the project.
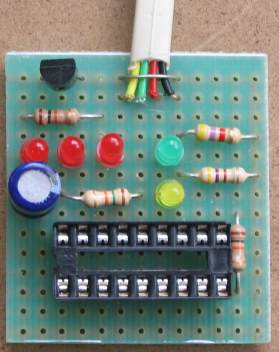
Complete PIC Programmer
MkV
Top and bottom view of
PIC Programmer MkV
The wiring is under the board.
The top view shows the underside wiring to help you
follow the circuit.
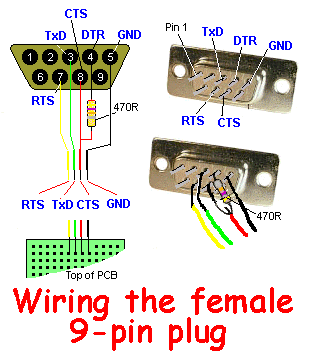
WIRING THE PLUG AND
LEAD
The lead can be any 4-core
cable. We have used 4-core telephone cable. Follow the diagram to
prevent any mistakes. The 470R resistor is soldered to pins 4 and 8 of
the female plug.
IF IT DOESN'T WORK
The 5v supply
voltage for the chip and the 13v-14v programming voltage comes from the
RS-232 feature of the serial port. Some of the lines making up the
RS-232 are capable of rising to a positive voltage (about 8 to 12v) and
falling to a negative voltage (about -8v to -12v). There are also lines
that fluctuate from 0v to +5v. But unfortunately some computers
fluctuate between +8v and -8v and some are less.
If the 3 red LEDs on the programmer do not illuminate when a chip is
inserted, the most common problem is the 13v rail. The lines are not
producing the 13v rail.
To solve this problem, fit 4 tiny button cells between the 15k resistor
and Vpp of the chip.
Only a very small current is required when programming and zero current
is taken when the chip is removed, so the cells with last a life-time.
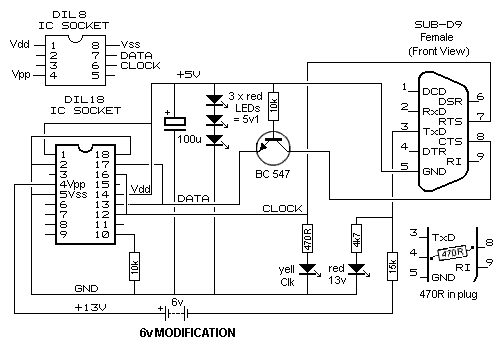
PIC PROGRAMMER MkV
with 6v Modification
USING OTHER PROGRAMMERS
There are many programmers on the market to program PIC
chips but this project is the cheapest. We have designed it to program
two of the smallest and cheapest chips in the range.
If you don't have a computer with a serial port, you will need a
lap-top and buy a programmer from MicroChip.
It is called PICkit-2 and costs approx $65.00.
It uses the USB port found on most lap top computers.
It comes with 2 disks containing all the software you need and is designed to program "In-Circuit."
But you will need an adapter to connect between PICkit-2 and the project
you are developing. This
adapter
comes from Talking
Electronics. You will need to add 5 pins to your project to accept the
adapter. More about this on Talking Electronics website. See: 'In
Circuit Programming."
PICkit-2 is available from MicroChip:
http://www.microchipdirect.com/productsearch.aspx?Keywords=DV164120
(cost $50.00 USD plus postage). The PICkit-2 from MicroChip is a
"package" that also contains 2 CD's and an extra PC board that connects
to the programmer so any 8, 14, 18 and 20 pin micros can be programmed. The
board contains 4 LEDs, a push-button and a pot as well as some
extra lands so you can create a small project.
The
adapter
that connects PICkit-2 to the project (you are designing) must
be purchased from Talking Electronics - otherwise you will have to use
the PC board (called an experimental board) that comes with PICkit-2 from Microchip
and move the chip to this board while it gets "burnt" (programmed).
|
|
|
|
INSTALLING THE SOFTWARE
This programmer requires software to perform the "programming"
or "burning" operation.
The software is called
IC-Prog 105C-a and can be
found on talking electronics website. Create a file and call it
PIC files. Download the .zip file into PIC files. Use: "Extract Here"
to extract the file to produce:
icprog105c-a.exe
Right-click your mouse on the file and select "Send to:" Desktop
(create shortcut)
A folder will appear on your Desktop with a short-cut to IC-PROG.
For help setting up the port on your computer and getting the program to run,
see Multi Chip Programmer on Talking Electronics website.
or Multi Chip Programmer
Next put MPASM into
PIC files folder. Use: "Extract Here" to
extract the file to produce:MPASM.exe
Next put
NotePad2 into
PIC files folder. Use: "Extract Here" to extract
the file to produce:NotePad2.exe
Next put .inc into
PIC files
Finally look through the
list of projects and put one or more .asm files into PIC
files
![]()
ICONs on your desktop.
MPASM and ICProg are in PIC files folder
|
Help with installing IC-Prog You will need the following files: directio.zip (35KB) loaddrv.zip (28KB) One By running a utility called "totalio.sys," (in directio.zip) all applications get full control of the I/O ports and thus IC-Prog works perfectly under Windows XP and Windows 2000, since the IC-Prog driver that is available doesn't work for XP (at least it doesn't work for me). How To Use IC-Prog with Widows XP/NT/2000: You can download a driver for IC-Prog from their website - it is called "icprog.sys" but it is really just a renamed driver originally called "giveio.sys". This utility was written by Dale Roberts as one of a set of utilities to give applications under NT more control over the I/O ports. Clicking on the "Enable NT/2000/XP Driver" check box in the settings will try to install this "icprog.sys". Under XP (on my box anyway), it installs but can't be started. There is probably some black magic regarding security permissions when creating symbolic links. The purpose of this driver is to give an application access to the I/O port but only through the driver. This is because XP, like 2000 and NT, doesn't let you have full access to I/O ports like in 95/98/MS-DOS. However, there is another way. By using another utility written by Dale Roberts, called "totalio.sys", ALL applications can have full control over the I/O ports, and not through a driver's interface. This means you can let IC-Prog use "Direct I/O" instead of "Windows API (in the "Interface" group of hardware settings) and ignore the "Enable NT/2000/XP Driver" option completely. "totalio.sys" (in theory) should also let any programs which control ports directly to work under XP. Installing "totalio.sys": Extract "totalio.sys" from the "directio.zip" file to "C:\Windows\system32\drivers" directory (or equivalent).
Extract "loaddrv.exe" from the "loaddrv.zip" file
and run it. UPDATE!!! : Settings for how to use IC-Prog with Windows XP. Open a browser and select the file ic-prog.exe Press right button on your mouse Go to Properties Go to Compatibility menu Set compatibility mode as Windows 2000 or Windows 98 / Win ME Press Apply icon Press Accept icon You need to copy icprog.sys into the SAME directory as icprog.exe. Then you can enter in the ic-prog software, go to Settings, Options and choose the Misc. page. There you can enable the "NT/2000 Driver" it will then be installed. |
Settings to use IC-Prog with Windows XP:
-
Open a browser and select the file ic-prog.exe
-
Press right button on your mouse
-
Go to Propertties
-
Go to Compatibility menu
-
Set compatibilty mode as Windows 2000 or Windows 98 / Win ME
-
Press Apply icon
-
Press Accept icon
You need to copy icprog.sys into the SAME directory as icprog.exe. Then you can enter in the ic-prog software, go to Settings, Options and choose the Misc. page. There you can enable the "NT/2000 Driver" it will then be installed.
More help:
Make sure you tick the *enable NT/2000/XP driver* under the options> Misc tab. Make sure you have the 6kb driver file in the same folder as the icprog.exe
You can
also use other software such as:
WinPic800
(website:
http://perso.wanadoo.es/siscobf/winpic800.htm ).
WinPIC technical info (http://www.qsl.net/dl4yhf/winpic/
).
1. Connect
the programmer to the PC serial port.
2. Start the IC-Prog software and under 'Settings -
Hardware' select JDM Programmer.
3. Insert the PIC into the programming socket.
4. Test the programmer is connected with 'Settings -
Hardware Check - Enable Clock'
Here is a reply from Jon Wilder
I'm here to tell
you that I personally have tested the programmer on
a computer with Asus A7N8X-E Deluxe motherboard
which I got in 2004 and I run a 1.83GHz Athlon XP
processor and I got it to work!
What you have to do is go into your computer's BIOS
and change the parallel port mode to "SPP" (Standard
Parallel Port). ECP+EPP will not work.
Also, I have found a Windows based program that
works just fine in WinXP Pro with the programmer as
well. Not sure who it's made by but it is called
WinPic and for me with the parallel port set to "SPP"
mode in the BIOS this program worked flawlessly with
the programmer. Here is a link to it -
http://www.qsl.net/dl4yhf/winpicpr.html
Just thought I'd post up my experience with the
programmer for those of you who either still have
them or were planning to build them to let y'all
know that it has now been personally tested on a
machine with a processor faster than 500MHz and it
fully worked with no issues. The only thing to
remember is that it will not work with the parallel
port set to "Enhanced Parallel Port" mode. It must
be set to "Standard Parallel Port" mode.
23/10/2010