 |
REGENERATION
This word is rarely discussed in books and magazines in the area we are
about to describe. It's a very
clever and very important concept to understand.
It applies to a circuit that turns itself ON more and more due to the
output signal (from the circuit) being passed to the input.
There are many reasons why this is done and one of the earliest reasons
was for a radio receiver, to make it more sensitive.
Simple feedback - sometimes called negative feedback is not regeneration
- however it may be called de-generation.
In this example we study three examples in which the feedback
increases the "turn-on" of the circuit to such a point that the circuit
cannot turn on any more.
We normally think of "feedback" as "negative feedback," but it can also
be positive feedback and this should be called "feed-forward."
But the term "feedback" really means a signal from the "end of the circuit" being
passed to the "front of the circuit."
Regeneration can create a "run-away" situation where the circuit breaks
into oscillation or some other unwanted effect.
In our cases, it produces a very valuable effect.
CIRCUIT 1:
The first circuit we will study is a Schmitt Trigger. It has been taken from our BEC course,
page 32. The 10k pot is set so that the first transistor is turned on
when the thermal probe is cold.
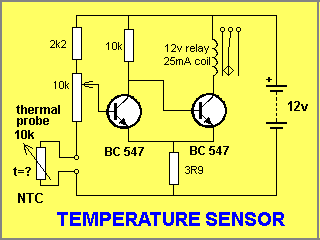
The thermal probe has a Negative Temperature Coefficient and this means
the resistance will decrease as the temperature rises. The actual rate
of change is not important however if the probe is placed into hot
water, the resistance will be about 6k. As the temperature on the probe
rises, the voltage on the base of the first transistor reduces and it
begins to turn OFF. This will
begin to turn ON the second transistor and the relay will start to be
energised.
But the interesting point is the feedback line between the two emitters
and the 3R9 resistor.
Current will flow in the
collector-emitter of the second transistor and also in the 3R9 resistor.
This will create a very small voltage across the 3R9 of say about 0.1v.
This voltage also appears on the emitter of the first transistor and
this means the voltage between base and emitter of the first transistor
is reduced. This causes the first transistor to turn off more and the
second transistor turns on more. This continues until the first
transistor is fully turned off and the second transistor is fully turned
ON.
This action has occurred without any change in resistance of the probe.
In fact the circuit has "snapped" into action and activated the relay
fully at the instant the circuit detected the precise resistance of the
probe.
In other words the circuit has created a REGENERATIVE action where the first
transistor gets turned off MORE AND MORE until the two transistors have
SWITCHED states VERY QUICKLY.
The point at which the circuit changes is due to the value of the
emitter resistor (3R9). This resistor creates the hysteresis (the gap
between the high and low temperature) and the actual low temperature is
determined by the value of 2k2 resistor.
The action of the circuit is such that the relay will open or close
very quickly at a defined temperature, even though the temperature does
not change.
The action of the two
transistors creates a SWITCHING EFFECT where the output changes
very rapidly from one state to the other.
This is very important if you are driving a relay as it prevents it
"chattering" and burning-out the contacts. The secret in the snap
action lies in the feedback line between the two emitters.
The circuit is designed to turn off a heater or other device when the
temperature reaches a certain value.
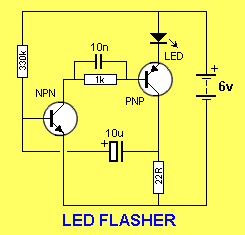
CIRCUIT 2:
The second circuit in this discussion is a LED Flasher. The circuit
flashes a LED very brightly for a very short period of time, at a rate
of about 2 flashes per second. The circuit is actually a very high gain
DC amplifier with some added components.
By removing the 330k and 10u electrolytic, we can see the two transistor
DC amplifier.
If the 330k is fitted, the LED will illuminate. In fact, the 1k and 10n
are not needed to see the LED illuminate, and the 22R current limiting
resistor is a very low value and will cause a very high current to flow
through the LED, so the circuit should not be operated for any length of
time as a DC amplifier.
By adding the 10u electrolytic, the output of the circuit is detected
and passed to the input.
Now, let's go over the operation of the circuit again.
Remove the 330k. The circuit will sit in a non-operating mode.
Fit the 330k.
The 330k will turn the circuit on but it will do this slowly because the
10u is also connected to the base of the first transistor and the
electrolytic has to charge to allow the voltage on the base to rise.
When the voltage on the base rises to 0.65v, the first transistor begins
to turn on and this turns on the second transistor.
Current flows in the collector-emitter circuit of the PNP transistor and
this causes a voltage to appear across the 22R resistor. This voltage is
passed to the base of the first transistor via the 10u, and now the base
of the PNP transistor sees more energy to turn it on. This effect is
passed to the second transistor and very quickly both transistors turns
each other on more and more until they are both fully turned ON.
This effect occurs without any more input from the 330k resistor. In
fact the 330k can be removed as soon as the two transistors start to
turn each other on.
Thus the circuit turns itself on by an effect called positive feedback.
This effect is also known as REGENERATION.
The 330k must be replaced to start the cycle
again and the rest of the description is covered in our
Flasher
Circuits article. The main point to note is the effect of
REGENERATION. Once the action
starts, it does not stop until the circuit is fully turned ON.
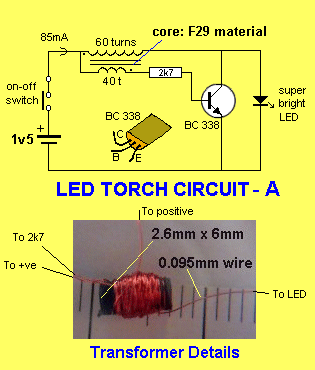
CIRCUIT 3:
The third circuit uses
feedback from a transformer to turn the circuit ON to a point where it is
fully turned on. It is taken from our
LED Torch
Circuits article. The cycle starts with the 2k7 resistor feeding
current into the base of the transistor. This starts to turn the
transistor on and current flows in the 60 turn winding and produces
magnetic flux that cuts the turns of the 40 turn winding. The 40 turn
winding produces extra voltage that adds to the original voltage and
this allows extra current to flow into the base of the transistor to
turn it on more.
This continues until the transistor is fully turned on. This action is
called positive feedback or more accurately REGENERATION.
The three circuits operate in exactly the same mode. This made is called
a SWITCHING MODE. They change from one state to another VERY
QUICKLY.
This action is called a SWITCHING ACTION or DIGITAL ACTION or DIGITAL
MODE. There are basically two types of circuits, DIGITAL CIRCUITS and
ANALOGUE CIRCUITS (also called audio circuits). An audio circuit operates over a smooth
range of low output to high output. A digital circuit goes from one
state to the other very quickly.
When this change is produced by the components within the circuit, the
action is called REGENERATION because the action cannot be stopped and
takes the transitor(s) from the state of not being turned on to the
state of being fully turned on.
Go to
P3